


If you’ve ever watched a perfectly tuned vision system start throwing false rejects on a hot afternoon, you know how quietly heat can unravel a production line. Nothing “changed,” yet image noise crept up, edges softened, and the camera suddenly needed a reboot. That’s thermal management coming due. The good news: overheating is predictable, measurable, and fixable—with the right heatsink strategy and a few system-level tweaks.
Below is a practical guide to why industrial cameras run hot, what heat does to your images and uptime, and how to size and integrate a heatsink that actually works on the factory floor.
Why Industrial Cameras Run Hot
Industrial cameras pack more processing into smaller enclosures every year. That’s great for performance, not so great for heat.
Where the heat comes from
- Image sensor: High frame rates, long exposures, and HDR modes push CMOS sensors to dissipate more power. The sensor is also thermally sensitive—its noise characteristics drift with temperature.
- Processing: FPGAs, ISPs, and SoCs (encoding, debayering, and inference at the edge) can add 2–6 W, sometimes more in compact cameras.
- Power conversion: PoE/PoE+ DC-DC stages aren’t perfectly efficient; a portion of your power budget turns into heat inside the camera body.
- Illumination: On-camera LED rings or nearby NIR floods warm the environment and, by conduction, the camera. Even if LEDs are “external,” heat radiates.
- Form factor: Compact housings, IP67 seals, and plastic or isolated brackets often leave heat with nowhere to go.
Environmental factors that amplify heat
- High ambient temperature: 35–50°C isn’t uncommon near ovens, forming machines, or in summer without HVAC.
- Sealed or stagnant air: IP-rated enclosures trap heat; zero airflow means you’re relying on radiation and slow natural convection.
- Mounting and orientation: A thin plastic mount insulates the camera; horizontal fins under a shelf shed less heat than vertical fins in free air.
What heat does to image quality and uptime
- More noise, more defects: Dark current roughly doubles every 6–8°C for many sensors. Expect higher noise floor, hot pixels, and fixed-pattern drift.
- Calibration drift: PRNU/DSNU changes, color shifts, rolling shutter artifacts, and gain/offset error all worsen as temperature rises.
- Optics shift: Lenses expand. Focus and back focal distance can drift with temperature, especially with plastic lens barrels or non-athermal designs.
- Reliability hit: A common rule of thumb is that every 10°C rise can roughly double failure rate (Arrhenius behavior). Adhesives soften, connectors age, solder fatigue accelerates.
- Throttling or shutdown: Some cameras actively throttle or cut off at high internal temperatures to protect the sensor.
How to Know When Your Industrial Camera Needs a Heatsink (Early Warning Signs of Overheating)
Most industrial camera overheating problems don’t start with dramatic shutdowns — they begin with small, easy-to-miss symptoms. And if you catch them early, you can prevent image drift, false rejects, and long-term reliability issues. Here’s how to recognize when your machine vision camera is running hotter than it should and likely needs a dedicated heatsink or better thermal path.
Image noise slowly climbs during the shift
If your images look sharp in the morning but show more grain, streaks, or fixed-pattern noise as hours pass, that’s the image sensor heating up. Since dark current doubles every few degrees, this is one of the most reliable signs of industrial camera thermal stress.
Hot pixels appear more often than usual
A few hot pixels are normal — but if new bright dots show up after the camera has been running for a while, your sensor temperature is rising. This is one of the earliest indicators that a machine vision system is approaching an overheating threshold.
Focus drifts after extended operation
Heat affects optics too. When the camera or lens assembly warms up, subtle expansion shifts your focus. If your system looks sharp at startup but slightly soft later, you’re seeing the effects of thermal expansion — a common issue in industrial environments with continuous operation.
The camera body feels unusually hot
A simple field check:
- If the camera housing feels too hot to touch for more than 2–3 seconds, it’s likely pushing above 55–60°C.
- At that point, both image quality and electronics reliability can decline.
Random GigE or USB disconnections
If your industrial camera randomly drops frames or loses connection during “the hottest part of the day,” that’s rarely a network problem. Warm PHY chips and overheated interfaces cause marginal signal loss and packet drops — both classic symptoms of overheating industrial cameras.
Image quality only recovers after a reboot
If operators report, “It’s fine after we restart it,” that is a red flag. Many cameras throttle their internal processing when temperatures climb. A reboot temporarily resets the thermal load — until it heats up again.
Noise jumps after enabling high-load features
A sudden increase in noise after boosting frame rate, turning on HDR, or activating NIR lighting signals that you’ve crossed your thermal budget. These modes increase power draw, and therefore heat, faster than most users expect.
Problems happen only during summer or near hot machines
If your vision system works flawlessly in winter but gets flaky in summer, or struggles near ovens, welders, motors, or furnaces, ambient heat is stacking on top of your camera’s internal heat load. This seasonal or location-based behavior is a big warning sign that you need better heatsinking or thermal conduction.
If your camera shows even one of these signs…
…it’s time to improve thermal management. This may mean:
- upgrading to a purpose-built industrial camera heatsink,
- improving the camera’s mounting for better heat conduction,
- increasing airflow,
- or reducing unnecessary processing/illumination load.
Industrial cameras don’t fail suddenly — they fail thermally over time. Fixing the heat path stabilizes image quality, eliminates false rejects, and dramatically improves long-term uptime.
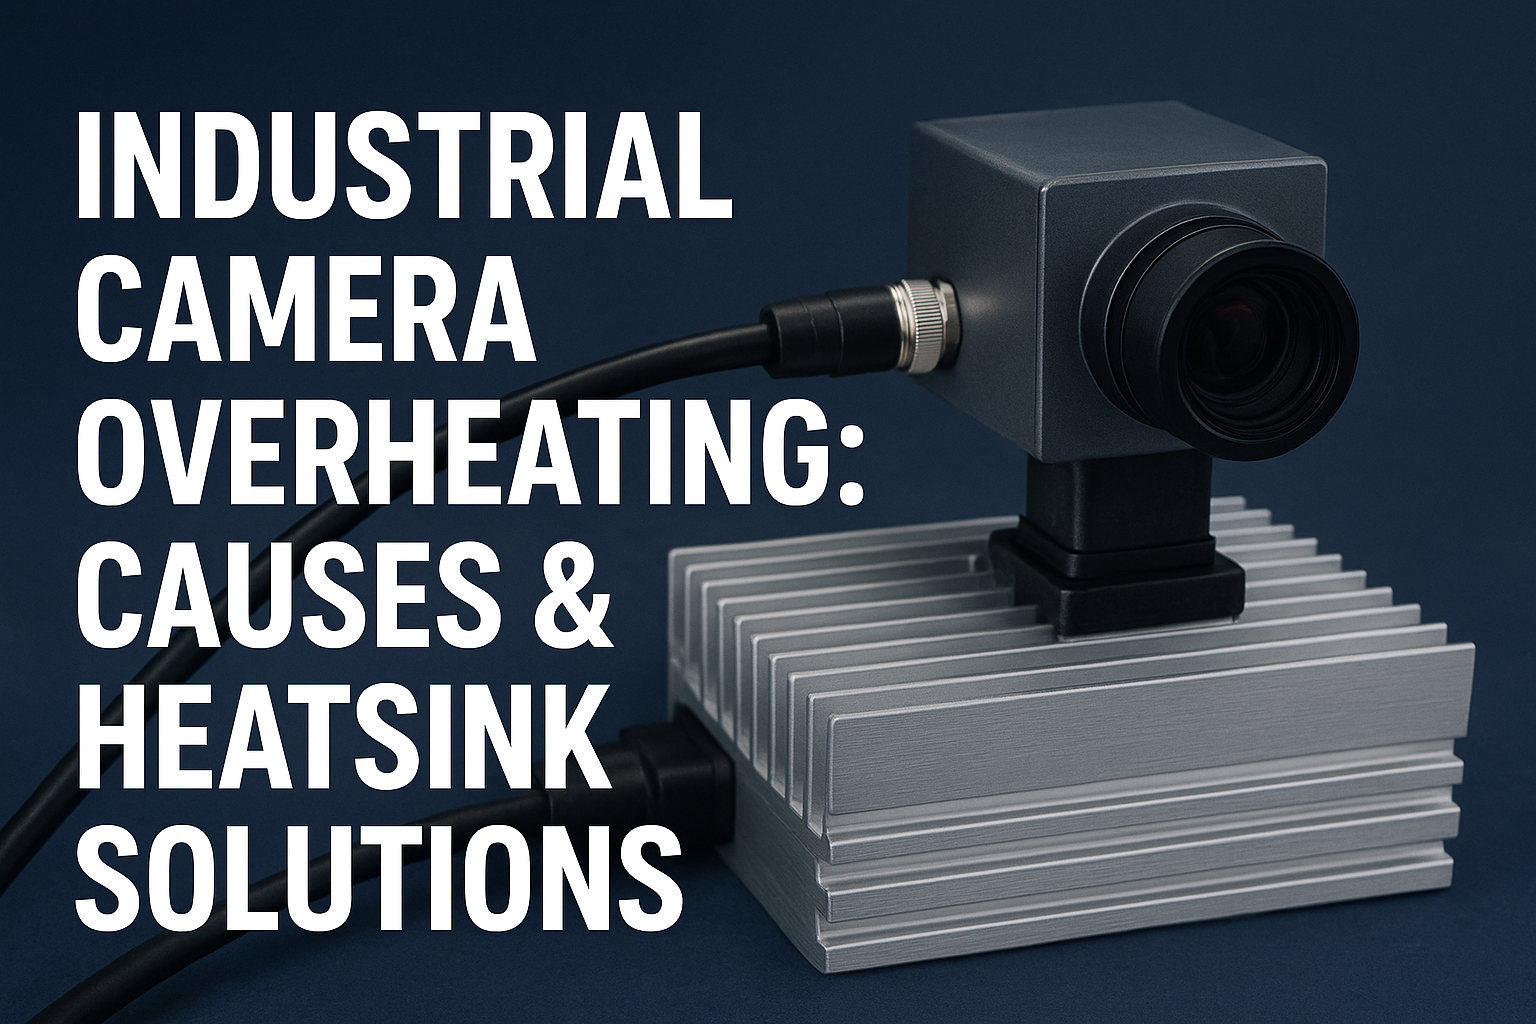
Engineering Breakdown of the Camera Heatsink Design
This heatsink is purpose-built for industrial imaging systems that operate under continuous load. In high-duty environments, machine-vision cameras generate significant thermal output, and unmanaged heat can quickly degrade sensor performance, electronics stability, and overall system life.
To address this, the heatsink is engineered using a high-conductivity metal block designed to pull heat away from the camera body with minimal thermal resistance.
The design incorporates:
- Integrated airflow channels to support forced-air cooling setups
- Optional water-cooling pathways for applications requiring superior thermal regulation
- High-surface-area fins (if applicable) to maximize heat dissipation
- Industrial-grade mounting interfaces to maintain consistent contact pressure
By maintaining a controlled operating temperature, the heatsink ensures:
- Stable camera performance during extended or continuous operation
- Reduced sensor noise and electronics distortion caused by thermal drift
- Longer service life for high-value vision hardware
- Lower risk of heat-induced failures, shutdowns, or intermittent faults
This cooling assembly is compatible with a wide range of industrial cameras used in robotics, automated inspection, smart manufacturing systems, and precision monitoring setups. It is designed to operate reliably in environments with dust, vibration, and elevated ambient temperatures.
In simple terms: the heatsink safeguards the camera’s thermal integrity so it can deliver consistent, high-accuracy imaging even in harsh, round-the-clock production conditions.
Diagnosing a Thermal Problem (Fast)
Before you pick a heatsink, confirm heat is truly the villain and quantify how much margin you need.
- Check internal telemetry: Many sensors expose a die or board temperature register. Log it at startup, after 15 minutes, and at steady-state load.
- Profile worst case: Frame rate maxed, exposure increased, HDR on, lights at full output, midday ambient. That’s your real design point.
- Measure power: An inline PoE meter is invaluable. Power in (W) is the heat you must shed if there’s no efficient external path.
- Use an IR camera or thermocouple: If using IR, stick a small patch of matte black tape on the surface to normalize emissivity. For a quick gut-check: if you can’t keep a finger on the case for more than 3 seconds, you’re around 55–60°C at the surface.
- Look for environmental culprits: Warm air recirculating in cabinets, sunlight on an enclosure, LED drivers mounted right behind the camera—these are frequent offenders.
How a Heatsink Actually Helps
Heatsinks don’t “cool” by magic—they lower the thermal resistance from the camera to ambient by increasing surface area and improving convection and radiation.
Think of the thermal path as a simple series circuit:
- Junction-to-case (Rjc): Sensor or SoC to camera body
- Case-to-sink (Rcs): Thermal interface material (TIM) and contact
- Sink-to-ambient (Rsa): Heatsink geometry, finish, and airflow
The temperature rise is approximately:
ΔT = Q × (Rjc + Rcs + Rsa)
Where Q is heat in watts and ΔT is the allowable rise over ambient.
Real-World Applications of Industrial Camera Heatsinks
Industrial camera heatsinks play a critical role across multiple high-load vision environments. Here’s where they matter most — and why:
- Automotive Inspection Systems: High-speed weld checks, seam tracking, and surface inspection push sensors and onboard processors hard. Heatsinks help prevent thermal drift that can cause blur, false positives, or sudden frame drops during long production cycles.
- Electronics & PCB Manufacturing: AOI cameras often operate at high resolutions and magnifications. Even a small temperature rise increases sensor noise and fixed-pattern variation, which can disrupt defect detection. Proper heatsinking keeps image consistency tight.
- Food Sorting & Packaging Lines: Vision-guided sorting sits close to motors, conveyors, and warm enclosures. Thermal load builds up quickly. Stabilizing camera temperature reduces classification errors and keeps throughput predictable.
- Robotics & Cobot Vision Systems: Cameras mounted on moving arms face continuous vibration and fluctuating ambient conditions. A well-coupled heatsink improves thermal dissipation and protects performance during heavy-duty, repetitive operations.
- Pharmaceutical & Medical Packaging: These systems rely on highly consistent imaging for print verification, blister inspection, and contamination detection. Sensor stability is non-negotiable — heatsinks help maintain calibration and color accuracy.
- Steel, Foundry & High-Temp Industrial Zones: Ambient temperatures can exceed 45–55°C. Without a heatsink, internal sensor temperatures quickly spike, leading to throttling or shutdown. Thermal management is often the only way to maintain uptime in these harsh conditions.
Passive, active, and hybrid options
- Passive extruded fins: The workhorse for industrial cameras. Choose vertical fins in natural convection; black anodizing boosts emissivity for better radiation.
- Pin-fin sinks: Less orientation-sensitive than straight fins; good inside cabinets or where airflow direction is uncertain.
- Heat spreaders: Copper bases, graphite sheets, or small vapor chambers spread hotspot heat before it hits fins.
- Active cooling: Small fans slash Rsa but bring dust, vibration, and maintenance. Typically avoided in IP-rated setups, fine for labs and test stands.
- Chassis conduction: Using a thick aluminum mounting plate or the machine frame as a “remote heatsink” is very effective, especially in sealed environments.
Sizing a Heatsink in Five Minutes
You need three numbers to ballpark a solution:
- Camera heat load (Q, in watts)
- Ambient temperature (Tamb)
- Max allowable case or junction temperature (Tmax)
Then estimate your total thermal resistance budget:
Rtotal = (Tmax − Tamb) / Q
Subtract the internal piece (Rjc + Rcs) to find the heatsink target Rsa.
Quick example
- Heat load (Q): 8 W (measured on PoE)
- Ambient (Tamb): 40°C
- Max case temperature target (Tcase): 70°C
Rtotal = (70 − 40) / 8 = 3.75 °C/W
Assume Rjc ≈ 1.0 °C/W and Rcs ≈ 0.2 °C/W with a good TIM.
Rsa target ≈ 3.75 − 1.0 − 0.2 = 2.55 °C/W
Pick a heatsink with Rsa ≤ 2.0 °C/W in your orientation and airflow to add margin. Vendors often quote Rsa at specific airflow; for natural convection, err conservative and oversize by 20–30%.
Details That Make or Break Performance
The difference between “warm and stable” and “still drifting” is usually in the integration details.
Thermal interface material (TIM)
- Use a high-conductivity pad (1–6 W/m·K) if surfaces aren’t perfectly flat; compress 25–35% to avoid air gaps.
- Grease offers lower resistance but is messy and attracts dust; reserve it for lab or sealed assemblies.
- Phase-change pads can reduce pump-out over time with temperature cycling.
Contact quality and mounting
- Flatness matters: Surface irregularities add surprising resistance. Spot-check with feeler gauges or machinist’s dye.
- Maintain clamping pressure: Spring clips, shoulder screws, or Belleville washers keep pressure through thermal cycles.
- Avoid insulating coatings at the interface: Strip paint or use anodized surfaces only where you rely on radiation, not at the contact patch.
Finish and geometry
- Black anodizing increases emissivity, improving radiative heat loss—very helpful in stagnant air or sealed cabinets.
- Pin-fin for random airflow; straight fins for vertical natural convection. Avoid fins pressed against walls; leave breathing room.
Vibration and contamination
- Fans don’t love dust. If you must use one, add filtration and a maintenance plan.
- Dust blankets cut natural convection; plan periodic cleaning for exposed fins.
EMI and grounding
- Large heatsinks can act like antennas. Bond to chassis ground as needed, and verify no coupling into high-speed lanes.
Beyond the Heatsink: System-Level Fixes That Work
Cooling is a team sport. A few simple changes can lop several degrees off your steady-state temperature.
- Reduce unnecessary processing: Lower frame rate, limit resolution or use ROI, drop bit depth where acceptable, disable on-camera encoding if not needed.
- Trade gain for exposure: Lower analog gain and slightly longer exposures reduce sensor heat and noise simultaneously. Strobe lighting to maintain motion freeze.
- Move heat off the camera: Mount LED rings and drivers on their own bracket with a dedicated heatsink or frame coupling. Strobe at low duty cycle. Use the mount as a heat path: A 5–10 mm thick aluminum adapter plate, solidly coupled to the machine frame, often outperforms a larger freestanding fin.
- Mind your enclosure: Add conductive stand-offs that tie the camera to the enclosure wall; choose finned external enclosures for IP67 needs.
- Lens choices: Athermal or metal-bodied lenses drift less; lock focus at operating temperature, not at room temp.
- Power discipline: Right-size PoE class, avoid unnecessary DC-DC stages, and keep cables reasonable to reduce dissipation in the camera.
A Quick Field-Style Example
A 6 W GigE camera in a sealed IP67 enclosure was running above 80°C internally by midday in a 43°C plant. Image noise rose, and intermittent faults began. The fix was straightforward:
- Added a 100 × 60 × 20 mm black anodized pin-fin heatsink to the camera’s base with a 1 mm TIM pad and spring-loaded screws.
- Replaced a thin plastic L-bracket with a 6 mm aluminum spreader plate tied to the machine frame.
- Moved the NIR ring light to its own bracket and strobed it at 10% duty.
- Limited processing to ROI and disabled on-camera H.264.
Net effect: roughly 12–15°C lower sensor-reported temperature, stable images, no afternoon drop-offs.
Practical Checklist
- Confirm worst-case power (W) and ambient (°C); measure, don’t guess.
- Set a realistic temperature target based on sensor specs and reliability goals.
- Calculate Rsa and select a heatsink for your orientation/airflow with margin.
- Use an appropriate TIM; verify contact pressure and flatness.
- Couple the camera to a thermal mass (plate or frame) whenever possible.
- Validate with logging: internal sensor temp, surface thermocouples, and image noise metrics.
- Re-check after 30–60 minutes at steady state and again at the hottest time of day.
- Plan maintenance for dust-prone environments.
FAQs: Industrial Camera Overheating and Heatsinks
Q. What causes industrial cameras to overheat in factory environments?
Industrial camera overheating usually results from three sources: the CMOS image sensor, the ISP/FPGA/SoC, processing ranging embedded, power conversion losses - especially with PoEs, and lack of appropriate temperatures dissipation and heat control in compact sealed housings. A great severity of the above described situation can be obtained from: high ambient temperatures, stagnant air, and additional illumination with LED or NIR ring lights. Also, adding insulating mount and IP-rated enclosure, internal temperature can climb quickly even at steady frame rates.
Q. How does overheating affect machine vision image quality and reliability?
Heat raises sensor noise—dark current often doubles every 6–8°C—so you’ll see more hot pixels, fixed-pattern drift, and softer edges. Optics can shift focus as materials expand, and electronics may throttle or throw intermittent faults, hurting vision system uptime. Over time, elevated temperature accelerates failure mechanisms, reducing MTBF and increasing unplanned downtime.
Q. Do heatsinks really help industrial cameras? Which type works best?
Yes. A properly sized heatsink lowers the sink-to-ambient thermal resistance so the camera can shed heat via convection and radiation. For natural convection, black-anodized straight fins (mounted vertically) or orientation-agnostic pin-fin heatsinks are reliable choices; in sealed cabinets, pin-fin or an external finned enclosure performs well. Fans can slash temperatures but are risky in dusty or IP67 setups unless you can filter and maintain them.
Q. How do I size a heatsink for my industrial camera?
Begin with the maximum allowable power dissipation (W), the worst-case temperature (°C), and the maximum allowable case or junction temperature. Compute Rtotal = (Tmax − Tamb) / Q then take away internal resistances (Rjc + Rcs) and find the needed sink-to-ambient (Rsa). For instance, 8 W at 40°C ambient with a 70° case target gives Rsa ≈ 2.55°C/W. Go for a heatsink with a rating ≤ 2.0°C/W in still air to have a safety buffer.
Q. Do I need thermal interface material (TIM) between the camera and the heatsink?
Yes—TIM fills microscopic air gaps that block heat flow. Use a compressible pad (1–6 W/m·K) when surfaces aren’t perfectly flat and maintain steady clamping pressure with spring hardware or belleville washers. Grease or phase-change materials can offer lower resistance in sealed assemblies, but pads are cleaner and more robust on the factory floor.
Q. How can I cool an IP67 or sealed camera without using a fan?
Go fanless with conduction and radiation. Couple the camera to a thick aluminum plate or the machine frame, use a black-anodized external finned enclosure, and maintain clearance for natural convection outside the box. Move LED rings and drivers off the camera, strobe illumination to cut duty cycle, and avoid plastic or thin brackets that insulate the thermal path.
Conclusion
Overheating in industrial cameras isn’t a mystery—it’s a thermal path problem. Once you quantify the heat load and give it a low-resistance route to ambient, image quality steadies, false rejects vanish, and uptime improves. A well-chosen heatsink, solid mechanical coupling, and small firmware tweaks deliver most of the benefit, often without redesigning the camera or enclosure.
If you’re scoping a new build or troubleshooting a hot camera now, keep this guide handy. Want a simple heatsink sizing worksheet or a second set of eyes on your numbers? Reach out, and we’ll happily share a quick template you can drop into your next design review.


Post Comments