


Jenkins is used to execute continuous integration/continuous delivery and deployment (CI/CD) called as pipelines and it is an open-source CI/CD DevOps automation software tool written in the Java programming language. It is run as a standalone application; in this process it has built-in application server or java servlet container.
Pipelines are the automate testing and reporting on changes in a code hub in real time and facilitates the integration of disparate branches of the code into a main branch. These are automatically detecting the errors in code, build the project, run automate testing the project, prepare the code for deployment, and it will deploy code to virtual machines and cloud servers.
Steps to install Jenkins in Ubuntu
Step 1: firstly, we have to install java open jdk
To setup java in your computer follow below commands in terminal
To update Ubuntu packages
* sudo apt update
To install open jdk
* sudo apt install openjdk-11-jre
To check the java version
* java –version
Step 2: Install Jenkins
Type below command to add GPG key for Jenkins repository
* curl -fsSL https://pkg.jenkins.io/debian-stable/jenkins.io.key | sudo tee \
/usr/share/keyrings/jenkins-keyring.asc > /dev/null
To add jenkins repository in your computer
* echo deb [signed-by=/usr/share/keyrings/jenkins-keyring.asc] \
https://pkg.jenkins.io/debian-stable binary/ | sudo tee \
/etc/apt/sources.list.d/jenkins.list > /dev/null
To update the packages
* sudo apt-get update
To install Jenkins, follow below command
* sudo apt-get install Jenkins
Step 3: Run the below commands to start and enable Jenkins
* sudo systemctl start Jenkins
* sudo systemctl enable Jenkins
To verify Jenkins active status
* sudo systemctl status Jenkins
Step 4: Jenkins can run in java servlet containers they are Apache Tomcat or Glassfish in our case we are using Apache tomcat, To setup apache2 as reverse proxy
To install apache2 package
* sudo apt install apache2
Run below command to add the modules for reverse configuration
* sudo a2enmod ssl rewrite headers proxy proxy_http
Creating virtual configuration using nano editor
* sudo nano /etc/apache2/sites-available/jenkins.conf
Run the below command to run the virtual host configuration
* sudo a2ensite jenkins.conf
To verify apache2 configurations
* sudo apachectl configtest
To restart the apache2 for applying new changes
* sudo systemctl restart apache2
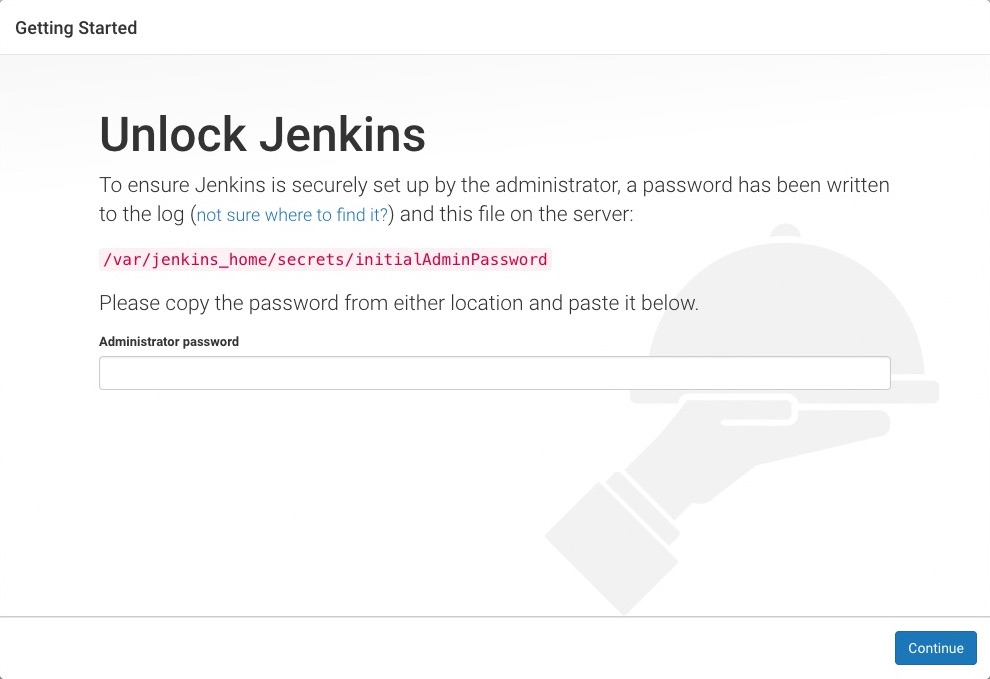
After installation Jenkins we have to unlock the Jenkins by following the below steps
Unlocking Jenkins
1. Open http://localhost:8080 in a browser, it will open unlock Jenkins page and asks administrator password
2. you can get password from below command
* sudo cat /var/lib/jenkins/secrets/initialAdminPassword
Customizing Jenkins with plugins
3. After unlocking Jenkins, the Customize Jenkins page will appear. Here you can install necessary plugins
Click one of the two options shown:
* Install suggested plugins - This option will install suggested plugins
* Select plugins to install - This option you have to choose necessary plugins to install
Note: It will take few minutes to install plugins
Creating the administrator user
After the above process completion, Jenkins page asks to create an administrator user.
4. In the Create First Admin User page, Enter the required details and press the save and finish button
5. Finally, Jenkins is ready page will appear, now you can use Jenkins in your computer


Post Comments